
티스토리 뷰
OS : CentOS 6.10
Mysql : mysql-server-5.1.73-8.el6_8.x86_64
redis server : 5.0.5
tomcat : apache-tomcat-9.0.16
nginx : nginx-1.16.1-1
mysql connector : mysql-connector-java-5.1.22-bin
tomcat-cluster-redis-session-manager : redis-data-cache.properties , commons-pool2-2.6.2.jar , jedis-3.0.1.jar , tomcat-cluster-redis-session-manager-3.0.3.jar , slf4j-api-1.7.26.jar
Nginx : 192.168.31.111
Tomcat-1 : 192.168.31.112
Tomcat-2 : 192.168.31.113
Mysql : 192.168.31.114
Redis : 192.168.31.114
1. Nginx
# vim /etc/yum.repos.d/nginx.repo
[nginx]
name=nginx repo
baseurl=http://nginx.org/packages/centos/6/$basearch/
gpgcheck=0
enabled=1
# yum install nginx
# vim /etc/nginx/nginx.conf
user nginx;
worker_processes 1;
error_log /var/log/nginx/error.log warn;
pid /var/run/nginx.pid;
events {
worker_connections 1024;
}
http {
include /etc/nginx/mime.types;
default_type application/octet-stream;
sendfile on;
keepalive_timeout 65;
log_format main '$remote_addr - $remote_user [$time_local] "$request" '
'$status $body_bytes_sent "$http_referer" '
'"$http_user_agent" "$http_x_forwarded_for"';
upstream backend_tomcat {
#ip_hash;
server 192.168.31.112:8080 weight=1 max_fails=2 fail_timeout=10s;
server 192.168.31.113:8080 weight=1 max_fails=2 fail_timeout=10s;
}
server {
listen 80;
server_name _;
charset utf-8;
location / {
root html;
index index.jsp index.html index.htm;
}
location ~* \.(jsp|do)$ {
proxy_pass http://backend_tomcat;
proxy_redirect off;
proxy_set_header Host $host;
proxy_set_header X-Real-IP $remote_addr;
proxy_set_header X-Forwarded-For $proxy_add_x_forwarded_for;
proxy_next_upstream error timeout invalid_header http_500 http_502 http_503 http_504;
}
}
}
# /etc/init.d/nginx start
2. Tomcat 설치
- java install
# yum install java
- tomcat 다운로드 및 설치
# cd /usr/src
# wget https://archive.apache.org/dist/tomcat/tomcat-9/v9.0.16/bin/apache-tomcat-9.0.16.tar.gz
# tar xvzf apache-tomcat-9.0.16.tar.gz
# mv apache-tomcat-9.0.16 /usr/local/tomcat
# vim /usr/local/tomcat/conf/server.xml
<GlobalNamingResources>
<Resource name="jdbc/TestDB" auth="Container" type="javax.sql.DataSource"
maxActive="100" maxIdle="30" maxWait="10000"
username="javauser" password="javapasswd" driverClassName="com.mysql.jdbc.Driver"
url="jdbc:mysql://192.168.31.114:3306/javatest"/>
</GlobalNamingResources>
<!-- Realm className="org.apache.catalina.realm.UserDatabaseRealm" resourceName="UserDatabase"/>
-->
< Host name="localhost" appBase="webapps" unpackWARs="true" autoDeploy="true">
-->추가 <Context docBase="web/webapp1" path="" reloadable="true"/>
# vim /usr/local/tomcat/conf/context.xml
-->추가 <ResourceLink name="jdbc/TestDB" global="jdbc/TestDB" type="javax.sql.DataSource" / >
# mkdir -p /web/webapp1
# vim /web/webapp1/index2.jsp

# cd /usr/src
# yum install unzip wget
# wget https://github.com/ran-jit/tomcat-cluster-redis-session-manager/releases/download/3.0.3/tomcat-cluster-redis-session-manager.zip
# unzip tomcat-cluster-redis-session-manager.zip
# cd tomcat-cluster-redis-session-manager
# cp -R lib/* /usr/local/tomcat/lib
# cp -R conf/* /usr/local/tomcat/conf
# vim /usr/local/tomcat/conf/redis-data-cache.properties
redis.hosts=192.168.31.114:6379
redis.password=test@123
- mysql-connector 설치
# cd /usr/src
# wget http://www.java2s.com/Code/JarDownload/mysql/mysql-connector-java-5.1.22-bin.jar.zip
# unzip mysql-connector-java-5.1.22-bin.jar.zip
# mv mysql-connector-java-5.1.22-bin.jar /usr/local/tomcat/lib/
# cd /web/webapp1
# mkdir WEB-INF
# vim /web/webapp1/WEB-INF/web.xml
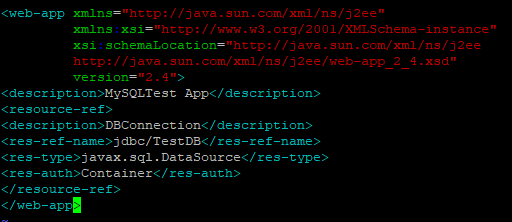
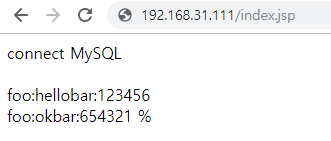
# vim /web/webapp1/index.jsp

- tomcat-1
# cd /usr/local/tomcat/bin
# ./startup.sh
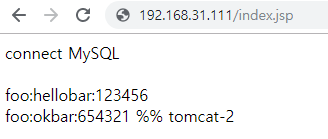
* tomcat-1 , tomcat-2 는 모두 동일하게 세팅하며, 다른 부분은 서버가 다른것임을 확인하게 위해서
tomcat-2 서버에서는 index.jsp파일 끝에 tomcat-2 를 작성한다.
- Reids 설치
# rpm -Uvh http://dl.fedoraproject.org/pub/epel/6/x86_64/epel-release-6-8.noarch.rpm
# rpm -Uvh http://rpms.famillecollet.com/enterprise/remi-release-6.rpm
# yum --enablerepo=epel,remi install redis
# chkconfig redis on
# vim /etc/redis.conf
bind 127.0.0.1 192.168.31.114
# /etc/init.d/redis start
# netsta -ntpl
tcp 0 0 192.168.31.114:6379 0.0.0.0:* LISTEN 26105/redis-server
tcp 0 0 127.0.0.1:6379 0.0.0.0:* LISTEN 26105/redis-server
# redis-cli -h 192.168.31.114 -p 6379 -a test@123
192.168.31.114:6379> keys *
(empty list or set)
192.168.31.114:6379> set name lisi
OK
192.168.31.114:6379> keys *
1) "name"
192.168.31.114:6379> get name
"lisi"
192.168.31.114:6379>
- 세션 확인
# redis-cli -h 192.168.31.114 -p 6379 -a test@123
192.168.31.114:6379> keys *
1) "63D2E2EB3EEACE6F9BF37B14A1358803.tomcat-1"
2) "name"
- Mysql Database 연결 테스트
# mysql -uroot -p
Welcome to the MySQL monitor. Commands end with ; or \g.
Your MySQL connection id is 130
Server version: 5.1.73-log Source distribution
Copyright (c) 2000, 2013, Oracle and/or its affiliates. All rights reserved.
Oracle is a registered trademark of Oracle Corporation and/or its
affiliates. Other names may be trademarks of their respective
owners.
Type 'help;' or '\h' for help. Type '\c' to clear the current input statement.
mysql> create database javatest;
Query OK, 1 row affected (0.02 sec)
mysql> create table testdata(id int not null auto_increment primary key,foo varchar(25),bar int); Query OK, 0 rows affected (0.04 sec)
//Insert some data
mysql> insert into testdata(foo,bar) values ('hello','123456'),('ok','654321');
Query OK, 2 rows affected (0.01 sec)
Records: 2 Duplicates: 0 Warnings: 0
mysql> select * from testdata;
+----+-------+--------+
| id | foo | bar |
+----+-------+--------+
| 1 | hello | 123456 |
| 2 | ok | 654321 | +
----+-------+--------+
2 rows in set (0.00 sec)
mysql> grant all on *.* to javauser@'192.168.31.%' identified by 'javapasswd';
Query OK, 0 rows affected (0.00 sec)
mysql > flush privileges;


- redis 모니터링
# curl -sSL https://rvm.io/mpapis.asc | gpg --import
# curl -L get.rvm.io | bash -s stable
# gpg2 --keyserver hkp://pool.sks-keyservers.net --recv-keys 409B6B1796C275462A1703113804BB82D39DC0E3 7D2BAF1CF37B13E2069D6956105BD0E739499BDB
# source /etc/profile.d/rvm.sh
# rvm reload
# rvm install 2.3.3
# rvm list
# rvm use 2.3.3 --default
# gem install redis-stat
- 웹으로 모니터링
# redis-stat 1 -a test@123 192.168.31.114:6379 --daemon --server=8888

구조

참고)
http://www.sunrisenan.com/docs/tomcat/tomcat03.html
第 3 篇 : tomcat集群会话共享 - 李延召的官方网站
一、redis介绍 redis是一个key-value存储系统。和Memcached类似,它支持存储的value类型相对更多,包括string(字符串)、list(链表)、set(集合)、zset(sorted set –有序集合)和hash(哈希类型)。与memcached一样,为了保证效率,数据都是缓存在内存中。区别的是redis会周期性的把更新的数据写入磁盘或者把修改操作写入追加的记录文件,并且在此基础上实现master-slave(主从)同步。 Redis是一个高性能的key-value数据库。re
www.sunrisenan.com
'기록남기기' 카테고리의 다른 글
| jetty 설치 (0) | 2020.11.26 |
|---|---|
| k8s (0) | 2020.02.18 |
| mysql error : 1153 , 2020 (0) | 2019.06.03 |
| docker root 경로 변경 (0) | 2019.05.21 |
| mysql 컬럼 변경 (0) | 2019.05.21 |
- Total
- Today
- Yesterday
- 평생학습원
- confluent #kafka # control center
- 비트코인
- ㅗ험
- 우루과이
- redis
- ㅐ
- 하안동
- 마라탕#하안동
- 성수동
- 빗썸
- 검단
- 인시그니아
- ISA #연금저축펀드 #IRP
- 신천역
- centos7 #docker
- 오후전략 완료~ 신일전자 2100원/에스트래픽 4180원/분할매수/가치를 믿자!
- 인터파크 티켓팅
- 오징어청춘
- 먼 훗날 우리
- ㅅ음
- k8s #kubernetes
- 스시
- MySQL
- 영화
- 축구평가전
- 이자카야
- 성수
- 구글홈
- 광명동굴
| 일 | 월 | 화 | 수 | 목 | 금 | 토 |
|---|---|---|---|---|---|---|
| 1 | 2 | 3 | ||||
| 4 | 5 | 6 | 7 | 8 | 9 | 10 |
| 11 | 12 | 13 | 14 | 15 | 16 | 17 |
| 18 | 19 | 20 | 21 | 22 | 23 | 24 |
| 25 | 26 | 27 | 28 | 29 | 30 | 31 |